If you’re writing a long document that contains lots of tables, figures or illustrations (for example, a company report or a PhD thesis), using Word’s ‘Insert Caption’ tool helps you format, number and list them more efficiently.
In this post, I’ll explain what the Insert Caption tool is, describe the benefits of using it and give you step-by-step instructions on how to use it.
What is Word’s caption tool?
The Insert Caption tool allows you to create table headings and figure captions that are numbered automatically. They are kept with the table or figure they refer to.
You can use the tool to label tables, figures, illustrations, equations, diagrams and anything else that needs a numbered heading or caption.
From these labels, you can create lists (just like a table of contents) – a list of tables, a list of figures, and so on.
Where can I find the caption tool?
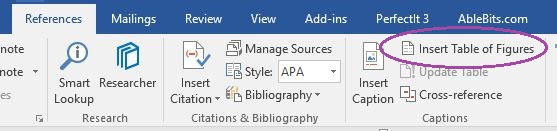
You can find the Insert Caption tool in the References tab, about halfway along the ribbon. Here’s how it looks in Word 2016:

Why should I use the caption tool?
Using the Insert Caption tool can save you loads of time and make your work more accurate.
- It numbers tables and figures automatically, so you don’t have to worry about getting the sequence wrong.
- The label stays with the table or figure it is for, so you won’t end up with a figure on one page and its caption on the next.
- After adding your labels, you can create a list of tables (or figures, or illustrations) that is formatted automatically and includes page numbers.
- If you decide to move, delete or insert an extra table or figure, you can easily update the numbering.
How do I use the caption tool?
The steps for inserting a label are almost exactly the same for a table heading, figure caption or illustration caption.
I’ll start with how to insert a table heading. I’ll then show you what to do differently if you want to insert a figure caption or illustration caption.
How to insert a table heading
Step 1: Click anywhere on the table that needs a heading. It doesn’t matter what order you label your tables in – Word will renumber them automatically.
Step 2: In the References tab, click on ‘Insert Caption’. A box will appear like this:

Under ‘Options’, the label should read ‘Table’ and the position should read ‘Above selected item’.
Step 3: Type your heading into the ‘Caption’ box at the top.

Step 4: Click ‘OK’. Your heading will appear above your table.
Step 5: Repeat the steps until you’ve labelled all the tables in your file.
How to insert a figure caption
The main differences when inserting a figure caption are that you need to change the label type to ‘Figure’ and (unless your style guide says otherwise) position the caption below the figure.
Step 1: Click anywhere on the figure. In the References tab, click on ‘Insert Caption’.
Step 2: When the box appears, click on the dropdown menu next to ‘Label’. Choose ‘Figure’.

Step 3: Make sure the position reads ‘Below selected item’.

Step 4: Type the figure caption into the ‘Caption’ box at the top (see Step 3 in the instructions for adding table headings).
Step 5: Click ‘OK’. Your caption will appear below the figure.
Step 6: Repeat the same steps to label all the figures in your file.
How to insert an illustration caption
If you need to label illustrations, such as photographs, you’ll need to create a new label. Here’s how to do this.
Step 1: Click anywhere on the illustration. Click on ‘Insert Caption’.
Step 2: When the box appears, click on ‘New Label’.

Step 3: In the box that appears, type in the word ‘Illustration’. Then click ‘OK’.

Step 4: Using the dropdown menu next to ‘Position’, choose whether you want your label to appear above or below your illustrations (it is conventional to position them below). Then type in the illustration caption and click ‘OK’, following the steps shown above.
How to create a list of tables or figures
Step 1: In the References tab, click on ‘Insert Table of Figures’. (Although it says ‘Figures’, you’ll need to click on this even if you want a list of tables or a list of illustrations.)
Step 2: A dialogue box will appear. Choose which type of label you want Word to use to create your list. For example, if you want a list of figures, choose ‘Figure’ from the dropdown menu.

Step 3: Click ‘OK’, and your list will appear.
You can then follow the same steps for any other lists you need.
How to update the numbering
If you move your tables and figures around so they are in a different order, or you decide to delete or insert one, it’s easy to renumber them.
Step 1: Highlight the whole document by pressing ‘CTRL+A’.
Step 2: Right click and choose ‘Update Field’.

Advanced features
The ‘Insert Caption’ tool automatically formats the labels in a specific colour, font and size. You can change these to match your thesis guide or house style. You can also change the number format.
How to change the label formatting
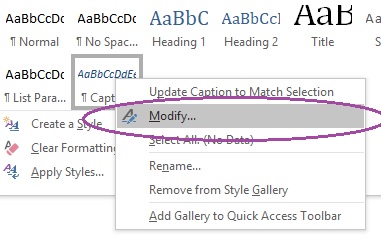
Step 1: Go into the ‘Home’ ribbon where you usually find the text styles. If you have already added table and figure captions, there should be a ‘Caption’ style in the styles pane.

Step 2: Right-click on ‘Caption’ and choose ‘Modify’. This will bring up a formatting box.
Step 3: In the formatting box, make the changes you want to see. For example, you might want to change the font, the font size, the colour, and the use of bold or italics.

Step 4: When you’ve finished, click ‘OK’. Your labels should now be formatted in the style you have chosen.
How to set the numbering style
Step 1: Click on ‘Insert Caption’ and then select the ‘Numbering’ button.

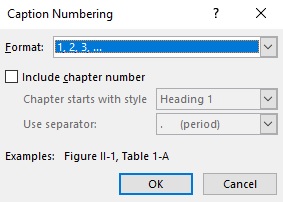
Step 2: Use the dropdown arrow next to ‘Format’ to change the numbering style.
If your document has many chapters and you need to include the chapter number in your figures and tables, click on ‘Include chapter number’. You can then choose from the options for how Word will identify a new chapter (this is where using heading styles comes in handy!) and separate the chapter and table/figure numbers in your label.
Over to you!
That’s it! You should now be able to add and format labels for tables, figures and illustrations and create lists for each.
I hope this guide has been helpful. If you would like any help with formatting your labels as part of an edit, please feel free to contact me.
Proofreader and copy-editor living in the Peak District, UK. Advanced Professional member of the Chartered Institute of Editing and Proofreading (CIEP). 'Owner' (ha, ha) of two feline assistants.


Great explanation of a complicated topic!
LikeLike
Thanks, Liz. I always think your guides on using Word are excellent, so that’s high praise indeed! 🙂
LikeLike
I’ve never used this feature either, Laura, so thanks for all these clear instructions!
LikeLike
Thanks, Helen! Really pleased it’s useful. I learned about it in a previous job where there were often long reports to edit, with tables and figures galore!
LikeLike
This is really helpful, Laura. I can’t believe I never knew about this until now! I also own two feline assistants (but really I think they own me) 🙂
LikeLike
Thanks, Denise! I’m so glad it’s helpful. Now to teach your ‘assistants’ … 🙂
LikeLiked by 1 person
There’s a lot of [[[[[lllll0000—[[]==[0908 happening when I’m trying to work sometimes 😀
LikeLike
They’re sooooo helpful, aren’t they?! Mine specialise in closing my laptop with their heads. 🙂
LikeLike